Integrating React into apps
Procedure for adding a javascript entry point:
- Write your javascript code. The code shall be in the javascript section in the "theme" folder, which is semantic-ui in the example above.
- in webpack.py, in the entry section, you shall provide the entry point name and the path to the entry point, relative to the theme folder (semantic-ui in this case)
theme = WebpackThemeBundle(
__name__,
".",
default="semantic-ui",
themes={
"semantic-ui": dict(
entry={
"documents_search": "./js/documents/search/index.js",
"documents_deposit_form": "./js/documents/forms/index.js",
},
dependencies={
"react-dnd-test-backend": "^16.0.1",
"@oarepo/file-manager": "^1.1.0",
},
devDependencies={},
aliases={"@js/documents": "./js/documents"},
)
},
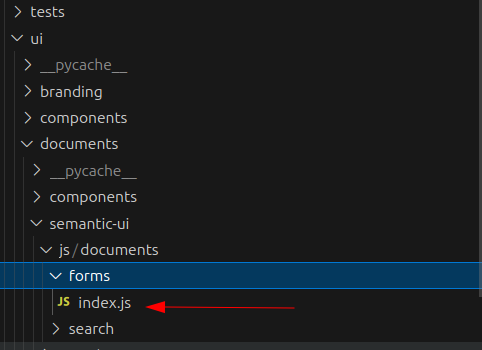
)This is where the form entry point would be placed in a real example:
- In your jinja template, you need to include this entry point as such:
In our example, this would be embedded into Deposit.jinja template, as it is entry point for the form.
{%- block javascript %}
{{ super() }}
{{ webpack['documents_deposit_form.js'] }}
{%- endblock %}- After you add a new entry point, it will be necessary to rebuild the javascript "manually" in order for this entry point to actually be available. This is done by running the following commands in your venv:
invenio webpack clean create
invenio webpack install
Integration Points
React components are typically mounted to specific DOM elements within Jinja templates, creating a seamless integration:
// Example of mounting a React component to a DOM element from a Jinja template
import React from "react";
import ReactDOM from "react-dom";
import { RecordActions } from "./components";

//

document.addEventListener("DOMContentLoaded", () => {
  const mountPoint = document.getElementById("record-actions");
  if (mountPoint) {
    // Parse the JSON data from the data attribute
    const recordData = JSON.parse(mountPoint.dataset.recordData || "{}");
    const recordId = mountPoint.dataset.recordId;

    // Pass both the ID and the parsed data object to the component
    ReactDOM.render(
      <RecordActions recordId={recordId} recordData={recordData} />,
      mountPoint
    );
  }
});
Above we can see data-* attribute used to pass data from the Jinja template to the React component. This allows for dynamic rendering based on the context of the page.
It also has an added benefit of avoiding the initial data fetching on the front end side. Though you can of course do that as well.
<div
  id="record-actions"
  data-record-id="{{ record.id }}"
  data-record-data="{{ record | tojson }}"
>
  <!-- React component will be mounted here -->
</div>
The object sent to the React component is a JSON object, so you can pass data of any complexity you want to the component.
Note that sometimes you can have multiple small react applications embedded in jinja/jinjax template. In certain cases, where there is no need for a react app, it is possible to embed vanilla javascript onto a page (jquery is also available inside of the repo).